|
|
Post by JustinW on Oct 10, 2006 10:18:26 GMT 11
Sitting looking under the back of the Wizard on Sunday I've come up with another solution that doesn't involve welding. Remember welding to the chassis requires certification. See sketch from my garage floor below.  Basically cut the left side bracket off about 40mm below the chassis and bolt a 50mm x 50mm equal angle on the stub. The tank will then bolt up to that. The sketch shows using a spacer on the right side but I would probably make a similiar bracket for that side as well. Leaving the left bracket long allows the tank guard to use the original mountings on that side. |
|
InVinceble
Isuzu Junior
 ....still says ISUZU on the motor!
Posts: 77
|
Post by InVinceble on Oct 10, 2006 19:03:09 GMT 11
...after another day on forest tracks wiping the tank guard through mud  I reckon a new smaller (as in less deep) tank is required. Anyone replaced their fuel tank? There is next to nothing clearance between the tank and the guard so an aluminium replacement guard is not really going to offer any ground clearance improvement. ...and who thought of putting the drain plug smack bang in the middle of the tank, it's only a matter of time before I'll be walking home  |
|
|
|
Post by geeves on Oct 10, 2006 19:35:55 GMT 11
I keep looking at that bolt hanging down below my tank gard and thinking I wonder if I can get a more flush plug. The plug on the transfer case is also vunerable although the gaurd on this is slightly harder to bend. Rock climbers in USA have managed to smash the gaurd on one rock then tear the bolt out on the next. Ive only had to straight that gaurd once It does need a big hammer
|
|
|
|
Post by JustinW on Nov 15, 2006 8:24:30 GMT 11
Well the tank lift is nearly complete. Brackets have been made and installed. Old mounting brackets cut off. Just need a couple of longer bolts and should be all go.  This photo is a bit blurry but shows the new bracket in place before cutting the old one off  This shows how high the tank sits. |
|
|
|
Post by isuzumudman on Nov 30, 2006 23:02:00 GMT 11
Hey, looks good. This is my next project. I have been mucking about with new running boards recently which have taken up most of my time. Sorry I forgot to mention the rear bumper going skewif after the lift. I had already realised it would never fit again and had discarded it pending a later project in steel. Never ending isn't it?
|
|
|
|
Post by JustinW on Dec 1, 2006 10:39:24 GMT 11
Went up the Matamata side of Thompsons Track the other weekend with my club and didn't touch on the tank once on the way up. Did manage to bash it on a rock on the other side though. Very pleased with the clearance.
As you can see from the photo above I need a new bumper. I've just found some one to fold me up some C section so I need to pull finger and decide what it is going to look like.
As with most of these jobs there is more time spent thinking about it than actually doing it!
It is never ending the next job, after/before/during the rear bumper is some bash plates underneath. Not to mention the other project like trying to get a V6 Surf auto to run without being connected to a computer!!!
|
|
|
|
Post by geeves on Dec 1, 2006 13:46:16 GMT 11
Why get a v6 surf auto to run without a computer???
You can get manual valve bodys for the nissan safari auto that alow manual picking of gears etc but realy these are only for rally trucks.
|
|
|
|
Post by JustinW on Dec 5, 2006 17:53:04 GMT 11
It is quite a common (well I know of at least two) choice of gearbox behind a Lexus conversion. It is used in place of the original Lexus box as the tail shaft is the wrong size. We currently have a double cab Hilux with a 191kW Lexus in it with a Surf box and it will go into reverse and overdrive only. The box is mechanically and electrically controlled. We also want to use this combo in the new winch truck (Coil sprung Prado chassis with extra cab Hilux body, short deck, PTO winch plus mid mounted 8274). One of our mates that runs this combo has a mate that was going to build a black box for us at cost but has got greedy and wants lots of hundred of dollars to do it! At the moment we have been playing with it in low ratio and it will do over 100km/hr!
|
|
InVinceble
Isuzu Junior
....still says ISUZU on the motor!
Posts: 77
|
Post by InVinceble on Dec 5, 2006 19:23:36 GMT 11
Slightly off the original subject but following the lift that I did.... Justin, how about a tubular design for your bumper? This is what I did.....   Exhaust had to be tweaked a little further downwards, but is to be replaced and will exit between the tubes on the right (once the hybrid turbo is finished). Tow hitch is now 280mm higher. ....and now have air plumbed to the rear to save me going under the bonnet. ;D |
|
|
|
Post by muvit madness on Dec 5, 2006 21:12:14 GMT 11
awsome looks great i'll have too try & adapt a similiar set up. what gauge pipe did you use also does the bars rap around your rear quaters, cant see from that shot. regards muvit  |
|
|
|
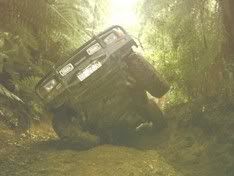
Post by JustinW on Dec 6, 2006 10:22:50 GMT 11
A mate of mine has a Patrol with rear bumper made from two pipes like InVinceble's one but it wraps around and has a plate welded in between (photo below). I'm tossing up between this style and a folded steel one. Either way it will definately wrap around.  |
|
|
|
Post by geeves on Dec 6, 2006 15:36:15 GMT 11
Justin I have a copy of the manual for the auto I can send you which might help. Its 4.8 meg so I have sent to your beca email not yahoo. From memory the conversion done on a lot of winch trucks uses a custom valve body inside the auto hence the price but it has been done with a bunch of relays and solinoids as well Not sure if you can control the lock up converter but if you can you have all the control of a manual downhill.
|
|
InVinceble
Isuzu Junior
....still says ISUZU on the motor!
Posts: 77
|
Post by InVinceble on Dec 7, 2006 17:38:13 GMT 11
to answer muvit madness' question....
I used 50mm galv water pipe which has a wall thickness of something in the region of 3.6mm
I went for the "straight cut" look - mainly 'cos bending that pipe was not on the easy to do list.
Plugged the ends with black acetol, matches the powdercoating quite well.
|
|
|
|
Post by polcat on May 22, 2007 19:03:21 GMT 11
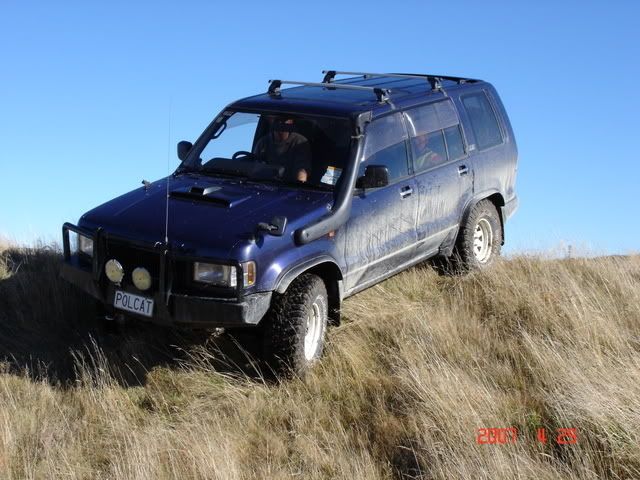
Hmmm - 2" helped at the front but my tank may need to go higher me thinks! A couple of holes found my rear end dragging - timely, the holes had been "improved" by 2 passes of the Land Rover club. By the way, a trial biker we helped out reckoned that they should be the 95% Toyota club from what he saw earlier in the day. Suspension lift is "on order" so will wait until after that for teh final verdict. Went for a river dip afterwards, saves on powerwashing time and is a laugh in it's own right, and 2' of body lift is of advantage there! Pics guys please, love to see the end result!! Thinking of doing one.  Cheers Stu |
|
InVinceble
Isuzu Junior
....still says ISUZU on the motor!
Posts: 77
|
Post by InVinceble on May 23, 2007 19:50:31 GMT 11
Here's my 2" body, 2" suspension lift: front.... You can see the white UHMWPE block sitting on the original mount, shocks are Rancho adjustables and that glimpse of orange in view is an uprated torsion bar from Maxitrac  rear.... departure angle is not as much of a worry as it used to be! After bending the trailing link a few times I'm starting to consider going to purpose bent (something along the lines of "StinkyFabs")  ....and I definately recommend a tank lift to go with the body lift.  |
|
|
|
Post by frn71e on Aug 2, 2007 21:15:43 GMT 11
Here's my 2" body, 2" suspension lift: front.... You can see the white UHMWPE block sitting on the original mount, shocks are Rancho adjustables and that glimpse of orange in view is an uprated torsion bar from Maxitrac rear.... departure angle is not as much of a worry as it used to be! After bending the trailing link a few times I'm starting to consider going to purpose bent (something along the lines of "StinkyFabs") ....and I definately recommend a tank lift to go with the body lift. How did u do ur tank llift? |
|
|
|
Post by JustinW on Aug 3, 2007 9:10:34 GMT 11
See top of this page for tank lift method. A couple of brackets made from 50x50 equal angle bolted to the existing brackets is the way to go. Cut off the section of the old bracket that protrudes below. The only hard part is carefully cutting the mounting brackets off the tank guard and welding them back on higher. In my case, with a 40mm body lift I lifted the tank 50mm
|
|
|
|
Post by muvit madness on Aug 3, 2007 19:50:41 GMT 11
sus/body lift looks great now all you need to do is sell them cheesecutters & get some bigger rubber to fill them guards up.  cheers muvit |
|
|
|
Post by polcat on Oct 3, 2007 19:10:18 GMT 11
Hi Where did you get your UHMWPE blocks?? cheers Stu Here's my 2" body, 2" suspension lift: front.... You can see the white UHMWPE block sitting on the original mount, shocks are Rancho adjustables and that glimpse of orange in view is an uprated torsion bar from Maxitrac rear.... departure angle is not as much of a worry as it used to be! After bending the trailing link a few times I'm starting to consider going to purpose bent (something along the lines of "StinkyFabs") ....and I definately recommend a tank lift to go with the body lift. |
|
InVinceble
Isuzu Junior
....still says ISUZU on the motor!
Posts: 77
|
Post by InVinceble on Oct 4, 2007 15:35:23 GMT 11
Ludowici plastics in Christchurch supplied me "Ceelene 1000 UHMWPE rod 60mm" call 03 343 7950.
|
|


 I reckon a new smaller (as in less deep) tank is required. Anyone replaced their fuel tank?